Tuesday, 9 June 2015

Text Wrapping: How to move Pictures around on Microsoft word 2013

Ms Office helps 2013 - Text Wrapping: How to move Pictures around on Microsoft word 2013
I published an article previous on how to insert pictures on Microsoft word which I believe you read it. I am very sure you have a question about that topic or let me ask round… if you have a question, let me see your hands up lolz.

There is one thing about pictures on ms word. When inserted, they can’t be moved around easily until you do this which I want to discuss in this tutorial.

I believe you have see this called Text wrapping below in the format menu or any where around your pictures but you don’t know there functions. I will definitely help you with them now.
Text wrapping controls the picture in your document. Without it, your pictures can’t move freely the way you want them to i.e. you can’t drag pictures from one point to the other freely.

How to move Pictures around
  • Insert a picture (if you don’tknow how to insert a picture, click here)
  • After inserting, click on the inserted picture. Locate the small square like shape at the top right of the picture. Check image below.
    Ms Office helps 2013 - Text Wrapping: How to move Pictures around on Microsoft word 2013
  • Choose either square, tight, through, infront bla blab la.
  • Now try moving your picture around and you will see that it’s moving.

Note: Each of those options has its own function. Like the in front of text brings your picture infront of any text while the behind text brings it at the back and so on.

METHOD 2
After doing this, you can now move your images anywhere you like with ease.


Try this today… it’s the little trick we use in moving images.


How to insert pictures in your Documents on Microsoft word

Microsoft office helps 2013 - How to insert pictures in your Documents on Microsoft word
Hello all,

Am here with something new for you… have you ever wondered on how to insert pictures in a document? It’s quite easy to do.

How to insert pictures:
  • Open a document / create a new document
  • Click INSERT
  • Then click pictures
  • From the dialog box that will display on your screen, locate the folder where you have your pictures.
  • Choose the one you will like to use then click Insert.
  • Immediately, the picture you selected will appear on your document.
Hope you did it? If you encountered any problem, do let me know. Thanks and ciao…

How to Insert Shapes and Type inside them on Microsoft Word

Hello friends,

I want to show you on how you can insert shapes on Microsoft word and type on them easily. It’s quite simple.
So people thinks it’s very hard / impossible to type in an insert shape but it’s not true. Remember, everything is possible. Okay if you think it’s easy to type in a shape, create one now and type it it. I know after creating the shape, you will be double click in it to see if you can type in it and after 5 mins, you will see that it’s a total waste of time lolz. Read the help for this below but first of all, lets learn how to create a shape.

How to create a shape
  • Open / create a new word document.
  • Click Insert then click Shapes
  • Choose any shape you like.
  • Now, click and drag to create shape.

Note: you can change the colour and do some other design for the shape but this particular post isn’t about that. But stay tuned to this blog for it.

We have created a shape, so let’s know how to write in it.

How to type in a shape
  • Create a shape if you haven’t done that
  • Then right click on the shape two times.
  • Click Add Text
  • Now the cursor will be inside the shape, you can now type anything you like in it.

You can see, it’s very easy to do. With this tip, you can type in any shape you like. If you doubt me, create another shape and follow the instructions.
Note: You won’t be able to write on a picture with this tip ooo… For it only works for shapes.


Hope this post helped you. If it dis, please do share it with your friends.

5 Tips to make your Document look good

Microsoft helps 2013 - 5 Tips to make your Document look good
Hello friends,

It’s very important that I share this article with you all.
Some things after typing a document, you might notice that it’s not looking presentable. You will even be ashamed of printing it. This article will definitely help you put an end to such situations. What you only need is a perfect guild for a perfect document.
I will try not to make it unnecessarily lengthy… Enjoy!

5 Tips to make your documents look good & presentable

Tip 1: Choose a clearer Font (font character)
Microsoft helps 2013 - 5 Tips to make your Document look good


Most times, we try to make our documents look fancy and enticing, finally we end up make it hard for the reader to read it. Too much of everything isn’t good.

A particular font might match a document type and might not march another type of document. For example, a letter (like those letters you address to your boss, school authorities etc) should have a very clear font type. Fonts like Calibri & times new roman should do the magic well. Georgia & Garamond can also be managed for it. But fonts like Forte, script bold, elephant etc should be avoided for the body of the letter because it will definitely scare the reader away.

Tip 2: Your Line Spacing
Microsoft helps 2013 - 5 Tips to make your Document look good


Your line spacing should really be considered whenever you are typing a document. You can’t use a 3.0 line spacing to type a letter and think the reader would be happy reading it. Always know what it’s expected from you and put yourself in the readers shoe… Ask yourself what you love reading. Am very sure that you don’t like a document having a sentence here and having another sentence too far away from it.
You can choose from 1.15 to 1.5 line spacing except you are told other wise.

Tip 3: The Font Size
Microsoft helps 2013 - 5 Tips to make your Document look good


Your document need to have a proper font size. It all depends on the document you are typing though but you should know the required font size for your document. Don’t make it too and don’t make it too big. For documents like letters, you can range between 11 – 14; don’t abuse this though.
Your sub headings can have another font size, like plus 2 of the size you use on the body of the letter. If the body of the letter is having 12, the sub headings can be 14.

Tip 4 Don’t Scatter your Document with so much designs.
Microsoft helps 2013 - 5 Tips to make your Document look good

Limit the way you colour texts on your documents, the bullet types you use and try to maintain either one or two bullets for a document.
Don’t abuse the highlight colour functions because it can make your document look like where children are colouring a portrait.

Tip 5 Don’t insert unnecessary pictures
Microsoft helps 2013 - 5 Tips to make your Document look good

If you know your document doesn’t need a picture, there is no point forcing one on it. Make it as neat as it should be and not as you want it to look. Unnecessary images can make the document look terrible. Try and minimize those pictures or don’t use any. But note, it also depends on the document type. If it’s something like a newsletter, pictures can be there but make sure you arrange them neatly and align them well. Don’t make them hang around anyhow. Have a perfect vision of how the document should be during or even before the creation.

I hope these tips helps you in making that document of yours look perfect and presentable. Go ahead and print it because it’s perfect now!


If this post helps you, do share it with your friends…

Wednesday, 27 May 2015

Ways to Create Tables on Microsoft Word

Ms office helps 2013 - Ways to Create Tables on Microsoft Word
Have done lots of cool stuffs with tables which I think they are really fun to do and practice. Doing things that would make people marvel is my hobby and am very delighted in doing them.

Working with tables is one thing I enjoy doing on Ms word even though sometimes it’s kind of stressful working on tables some else created but they are still fun though when you discover new tricks and some loop holes in the person’s work lolz.

Tables are been created to make works neater, aligned properly and to be place in a tabular way (that’s what I feel though). Like for example, typing a document that carries much data.
It’s neater to do them with tables than to be typing them just like that – they will definitely look rough and hard to read.
I will love to explain how to create a table. Will write deeper on this topic (formatting a table) on the long run.
How to create a table
  • Open Ms Word then create a new document or open an existing document
  • Click Insert
  • Click Table then move your cursor on those box and choose the size of table (columns and rows) you want. Notice that table size that’s changes ( 2 x 4) something like that. Choose the actual number of rows and columns you want.

 You can still create a table by following these steps below
  • Click Insert
  • Click Table
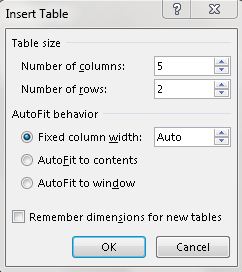
  • Then click Insert table
  • When the pop up window displays, put the actual number of rows and columns you want.
    Ms office helps 2013 - Ways to Create Tables on Microsoft Word
  • Choose any of the options below- fixed column width, auto fit to contents, auto fit to window
  • Then hit Ok when you are done.

Note: Column is from left to right while roll is from up to down.
And you can still use the Draw a Table function but I DON’T advise that you use this because it’s stressful and time consuming. It’s just like drawing a table manually!

LASTLY You can also Choose Quick Table were you choose from already designed tables to your convenience. It was done to relief you of table designing stress.

…on this note, I think it’s little ciao from me. Till another time. 

Things to do before typing a new document

Ms office help 2013 - Things to do before typing a new document
Hello friends,

I am here with something I think you should know before embarking on your typing journey with Ms word. You know that before doing anything in life, you got to know the fundamentals; things to note – to have at the back of your mind. Before creating any document in Ms word, you need to have these things registered in your hearts.

Am going be listing them below and write a little about each. I won’t bored you with so much information; just going to give you the ones that will definitely benefit you…

1. PAPER SIZE
Before starting anything, it is very important to check your paper size.  If what you want to type is A3, you should know that you got to change your paper size to A3. If it’s for A4, you got to choose A4.

Wondering how to change the paper size? Go to Page Layout, click Size (at the left corner of the screen) then choose your desired paper size.

2. PAGE ORIENTATION
Page orientation is also important… We do have two types of page orientation which is the Portrait and Landscape. Why? Some documents are in portrait modes while some are also in landscape mode. It all depends what the user whats and what the document deserve. If your document will suit well on Landscape either due to the breath size or whatsoever, it’s left for you. If it’s best on portrait then choose it.

Do you know how to change the Orientation?

Go to Page layout then click Orientation. After which, choose your desired orientation type.

3. MARGINS

Margins are also very important because it gives your documents the appropriate fittings that suits it. We have some many margin types, it all depends on what you want. Like if you are the type that loves typing very close to the edge of the paper, I think Narrow page margin fits you write.

NB: Normal page margin is always on default, it’s left for you if you want to it that way.

That’s all I have for you all today, continue checking this blog for more useful stuffs like this.

Don’t forget to share with your friends.

How to bring Excel Spreadsheet to Microsoft word Easily

Ms office help 2013 - How to bring Excel Spreadsheet to Microsoft word Easily
Hello friends,

One of my beginner’s tutorials for you and it's gonna be a very short one, i promise. 

It’s very easy to bring the excel spreadsheet cells to your Microsoft word document; with just some few clicks.

In this tutorial, I will be sharing with you the easiest way of insert those cells you see in excel on word 2013. Just follow me step by step on this.

How to Insert Excel Cells on Ms Word
  • Open your Microsoft word document or create a new document
  • Click on Insert tab at the top of the screen
  • Click Table
  • Choose Excel Spreadsheet and that’s all.
  • NB: to exit editing the cells, click outside.

 It’s so easy to do. Next time when you want to calculate that formulae, you don’t need to hurrily rush to excel because you can actually bring it down to Ms Word. I think this tutorial comes really handy and should be practiced.

Like Us on Facebook