Wednesday 27 May 2015

Ways to Create Tables on Microsoft Word

Ms office helps 2013 - Ways to Create Tables on Microsoft Word
Have done lots of cool stuffs with tables which I think they are really fun to do and practice. Doing things that would make people marvel is my hobby and am very delighted in doing them.

Working with tables is one thing I enjoy doing on Ms word even though sometimes it’s kind of stressful working on tables some else created but they are still fun though when you discover new tricks and some loop holes in the person’s work lolz.

Tables are been created to make works neater, aligned properly and to be place in a tabular way (that’s what I feel though). Like for example, typing a document that carries much data.
It’s neater to do them with tables than to be typing them just like that – they will definitely look rough and hard to read.
I will love to explain how to create a table. Will write deeper on this topic (formatting a table) on the long run.
How to create a table
  • Open Ms Word then create a new document or open an existing document
  • Click Insert
  • Click Table then move your cursor on those box and choose the size of table (columns and rows) you want. Notice that table size that’s changes ( 2 x 4) something like that. Choose the actual number of rows and columns you want.

 You can still create a table by following these steps below
  • Click Insert
  • Click Table
  • Then click Insert table
  • When the pop up window displays, put the actual number of rows and columns you want.
    Ms office helps 2013 - Ways to Create Tables on Microsoft Word
  • Choose any of the options below- fixed column width, auto fit to contents, auto fit to window
  • Then hit Ok when you are done.

Note: Column is from left to right while roll is from up to down.
And you can still use the Draw a Table function but I DON’T advise that you use this because it’s stressful and time consuming. It’s just like drawing a table manually!

LASTLY You can also Choose Quick Table were you choose from already designed tables to your convenience. It was done to relief you of table designing stress.

…on this note, I think it’s little ciao from me. Till another time. 

Things to do before typing a new document

Ms office help 2013 - Things to do before typing a new document
Hello friends,

I am here with something I think you should know before embarking on your typing journey with Ms word. You know that before doing anything in life, you got to know the fundamentals; things to note – to have at the back of your mind. Before creating any document in Ms word, you need to have these things registered in your hearts.

Am going be listing them below and write a little about each. I won’t bored you with so much information; just going to give you the ones that will definitely benefit you…

1. PAPER SIZE
Before starting anything, it is very important to check your paper size.  If what you want to type is A3, you should know that you got to change your paper size to A3. If it’s for A4, you got to choose A4.

Wondering how to change the paper size? Go to Page Layout, click Size (at the left corner of the screen) then choose your desired paper size.

2. PAGE ORIENTATION
Page orientation is also important… We do have two types of page orientation which is the Portrait and Landscape. Why? Some documents are in portrait modes while some are also in landscape mode. It all depends what the user whats and what the document deserve. If your document will suit well on Landscape either due to the breath size or whatsoever, it’s left for you. If it’s best on portrait then choose it.

Do you know how to change the Orientation?

Go to Page layout then click Orientation. After which, choose your desired orientation type.

3. MARGINS

Margins are also very important because it gives your documents the appropriate fittings that suits it. We have some many margin types, it all depends on what you want. Like if you are the type that loves typing very close to the edge of the paper, I think Narrow page margin fits you write.

NB: Normal page margin is always on default, it’s left for you if you want to it that way.

That’s all I have for you all today, continue checking this blog for more useful stuffs like this.

Don’t forget to share with your friends.

How to bring Excel Spreadsheet to Microsoft word Easily

Ms office help 2013 - How to bring Excel Spreadsheet to Microsoft word Easily
Hello friends,

One of my beginner’s tutorials for you and it's gonna be a very short one, i promise. 

It’s very easy to bring the excel spreadsheet cells to your Microsoft word document; with just some few clicks.

In this tutorial, I will be sharing with you the easiest way of insert those cells you see in excel on word 2013. Just follow me step by step on this.

How to Insert Excel Cells on Ms Word
  • Open your Microsoft word document or create a new document
  • Click on Insert tab at the top of the screen
  • Click Table
  • Choose Excel Spreadsheet and that’s all.
  • NB: to exit editing the cells, click outside.

 It’s so easy to do. Next time when you want to calculate that formulae, you don’t need to hurrily rush to excel because you can actually bring it down to Ms Word. I think this tutorial comes really handy and should be practiced.

Find and Replace: How to replace a word that appears multiple times in your document

Ms helps 2013 blog - find and replace
Hello friends,

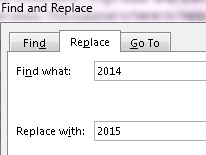
Have you been in that situation where you mistakenly type in a word/phrase continuously not knowing that it’s was an error? After typing, you then realised that you made that particular mistake over and over again and now it’s a stress to go back and start editing (replacing) them one after the other with the correct word. For example, you wanted to type “2015”, you were now typing “2014” in the entire document. Assuming this “2014” appears 30 times in the document, wouldn’t it be a big stress to go back and start editing each of them? Now, that’s why this article was made.

Find and Replace:  There is one feature I so love on Microsoft word and it’s this find and replace function – It’s very lovely. Using Find and replace makes it very easy for you to fix that error I talked about in the beginning paragraph (above) with just few clicks and you’re done. Let’s get started…

How to Use Find and Replace
  • Click Replace at the top right corner of the screen under Home tab.
  • A rectangular box would pop out, put the word you want to replace in that Find what box.
  • Then Put the word you want to replace it with in that Replace with box.
    Ms helps 2013 blog - find and replace
  • After that, click Replace all.
Automatically, every repetition of that particular word in your document would be replace.

It’s very easy to do. You wouldn’t struggle with that again because this tip will definitely help you. Any place you don’t understand do express it to me and I will try as much as possible to explain it better.

Thanks for visiting… Would be expecting your comments and also share this tip with your friends; you might not know who you may just help by sharing this article.

Tuesday 19 May 2015

Shortcuts: A – Z Ctrl shortcuts and their functions.

Ms Office help 2013 - Shortcuts: A – Z Ctrl shortcuts and their functions.

Hello friends,

Am here with an article I believe you should you should know to make our journey in exploring Microsoft word 2013 easier and more interesting.

One function of a machine I love so much is that it makes work easier and faster. If a suppose machine doesn’t make work easier and faster, then it shouldn’t be called a machine. Same goes to your operations in a computer.

Appling the necessary shortcuts  during operations makes your work easier, more interesting and faster. Professional users uses shortcuts all the time, so I suggest you start using one.
Below is a list of some shortcuts keys applicable in Microsoft word 2013. It’s a-z of your shortcuts keys using “Ctrl”.
NOTE: Hold the Ctrl key and the corresponding key for a particular shortcut.

A – Z shortcut key using Ctrl
  • Ctrl + A     = Select all
  • Ctrl + B     = Bold
  • Ctrl + C     = Copy
  • Ctrl + D     = Font (brings up the font dialog box)
  • Ctrl + E     = Centre Margin (Moves your texts to the centre of the sheet
  • Ctrl + F     = Find (find a particular word, sentence or phrase)
  • Ctrl + G    = Go to (go to a particular page, paragraph, line etc)
  • Ctrl + H    = Find and replace (find a particular word / text / sentence then replace)
  • Ctrl + I      = Italics
  • Ctrl + J     = Justify
  • Ctrl + K     = Hyperlink
  • Ctrl + L     = Left margin
  • Ctrl + M    = Margin
  • Ctrl + N     = New document
  • Ctrl + O     = Open existing document
  • Ctrl + P     = Print
  • Ctrl + Q     = Remove paragraph formatting
  • Ctrl + R     = Right margin
  • Ctrl + S      = Save
  • Ctrl + T     = Paragraph
  • Ctrl + U     = Underline
  • Ctrl + V     = Paste
  • Ctrl + W    = Close a document
  • Ctrl + Y     = Re-do
  • Ctrl + Z     = Un -do

Like Us on Facebook