Showing posts with label Tips. Show all posts

Saturday, 10 October 2015

Learn awesome page numbering tricks for Microsoft Word – Designing your Page numbers

Ms office helps 2013 - Learn awesome page numbering tricks for Microsoft Word – Designing your Page numbers
Hello all,

Have you ever wondered about creating different/unique page numbers? With lovely colours and better designs than the default “1,2,3”stuff?

We are approaching the end of the year and you might probably be thinking of typing an annual report for the year 2015. Or maybe, you are preparing a newsletter for your customers/clients that you will likely convert to a pdf and you really need the document to look unique and professional. Am here with the right article for you.

This article will be emphasizing more on page number design… I will definitely publish more tutorials on designing/creating a unique body for your newsletters, layout type to use, fancy header designs and so on but for now, let’s focus more on page number design.

Let’s get started
If you don’t know how to insert a normal page number, follow these steps below.
  1. Go to insert and click Page Number 
  2. Choose where you want it to be (up, down, right left or centre).

That’s all… Now, time for the fun/interesting part 

  • How to make it look Unique

Are you aware that the way Microsoft word numbers a page is through “header and footer”? If you don’t know that before, you actually do now. 

Another thing is that, header and footer repeats all over your available document pages. So what we are going to do is to place some shapes inside the header and footer region. Let’s begin…
  1. Create a page number and place it at the bottom right.
  2. Double click the created page number to open the header and footer tools. 
  3. Now, grab your mouse and click insert, shapes, and choose any shape you like. I chose a pentagon, turned it around and I filled it with orange colour and did some gradient fill for it.
  4. I duplicated the same pentagon shape, increased the size and fill it with white. Sent it behind the yellow pentagon. Finally, I placed a small circle at the top and painted it white. Check pics below 
  5. Place the shape on top of your number and send it to the back so that your number would be visible.
  6. After which, click “Close header and footer” at the top right corner of your screen.
  7. Scroll down all pages and see what appears.

That’s just it! 

This is just a basic page number design. You can keep tweaking it as you like; maybe placing two different shapes side by side or changing their colours. You can also draw shapes yourself with the pencil tool.

Tip: You can use your company logo instead of the basic shapes.

I will keep on posting more tutorials under this topic (advanced designs). Make sure you subscribe to my post in order not to miss any of them from this blog and remember, articles on letterhead designs are coming. Thanks!

Thursday, 9 July 2015

How to Retain a Document in Your Open Recent Document List Forever

Hello friends,

There are some important documents that we always wish to access very quickly but most times we end up searching for them. If it’s an emergency, it’s not good to be wasting time all because you are searching for a particular document that’s why I thought about this tutorial. If those documents are very close to you, it won’t be a problem locating them. If by going to Open existing documents, you immediately see such document, that will be very good but if it’s been long you typed/edited that document it might not be in the recent document list.

It is very annoying to be searching for a document whenever you need it. I don’t know about you but I really hate looking for something. 

Now the basic concept is this, assuming this particular document is pinned somewhere like a sheet of paper on a board or something, it will be very easy to locate right? That’s what we are going to do. We will pin that document somewhere so that whenever we need it, we will be able to lay our hands on it quickly.

How to Pin a Document
  • Open Microsoft office word then open that particular document
  • After that, go to file and click Open. Locate that particular document with it name and hover your mouse on it.
  • You will notice that pin icon by the right of the name, click on it.
  • By doing that, the document is forever pinned on your open recent document dialogue box. Anytime you need to open it, just go to open recent and you will see that particular document waiting for you to click it.

See, it is very easy to do. 
You don’t need to be looking for that document again. Cool ehn?

Share this with your friends…

Tuesday, 9 June 2015

5 Tips to make your Document look good

Microsoft helps 2013 - 5 Tips to make your Document look good
Hello friends,

It’s very important that I share this article with you all.
Some things after typing a document, you might notice that it’s not looking presentable. You will even be ashamed of printing it. This article will definitely help you put an end to such situations. What you only need is a perfect guild for a perfect document.
I will try not to make it unnecessarily lengthy… Enjoy!

5 Tips to make your documents look good & presentable

Tip 1: Choose a clearer Font (font character)
Microsoft helps 2013 - 5 Tips to make your Document look good


Most times, we try to make our documents look fancy and enticing, finally we end up make it hard for the reader to read it. Too much of everything isn’t good.

A particular font might match a document type and might not march another type of document. For example, a letter (like those letters you address to your boss, school authorities etc) should have a very clear font type. Fonts like Calibri & times new roman should do the magic well. Georgia & Garamond can also be managed for it. But fonts like Forte, script bold, elephant etc should be avoided for the body of the letter because it will definitely scare the reader away.

Tip 2: Your Line Spacing
Microsoft helps 2013 - 5 Tips to make your Document look good


Your line spacing should really be considered whenever you are typing a document. You can’t use a 3.0 line spacing to type a letter and think the reader would be happy reading it. Always know what it’s expected from you and put yourself in the readers shoe… Ask yourself what you love reading. Am very sure that you don’t like a document having a sentence here and having another sentence too far away from it.
You can choose from 1.15 to 1.5 line spacing except you are told other wise.

Tip 3: The Font Size
Microsoft helps 2013 - 5 Tips to make your Document look good


Your document need to have a proper font size. It all depends on the document you are typing though but you should know the required font size for your document. Don’t make it too and don’t make it too big. For documents like letters, you can range between 11 – 14; don’t abuse this though.
Your sub headings can have another font size, like plus 2 of the size you use on the body of the letter. If the body of the letter is having 12, the sub headings can be 14.

Tip 4 Don’t Scatter your Document with so much designs.
Microsoft helps 2013 - 5 Tips to make your Document look good

Limit the way you colour texts on your documents, the bullet types you use and try to maintain either one or two bullets for a document.
Don’t abuse the highlight colour functions because it can make your document look like where children are colouring a portrait.

Tip 5 Don’t insert unnecessary pictures
Microsoft helps 2013 - 5 Tips to make your Document look good

If you know your document doesn’t need a picture, there is no point forcing one on it. Make it as neat as it should be and not as you want it to look. Unnecessary images can make the document look terrible. Try and minimize those pictures or don’t use any. But note, it also depends on the document type. If it’s something like a newsletter, pictures can be there but make sure you arrange them neatly and align them well. Don’t make them hang around anyhow. Have a perfect vision of how the document should be during or even before the creation.

I hope these tips helps you in making that document of yours look perfect and presentable. Go ahead and print it because it’s perfect now!


If this post helps you, do share it with your friends…

Wednesday, 27 May 2015

Things to do before typing a new document

Ms office help 2013 - Things to do before typing a new document
Hello friends,

I am here with something I think you should know before embarking on your typing journey with Ms word. You know that before doing anything in life, you got to know the fundamentals; things to note – to have at the back of your mind. Before creating any document in Ms word, you need to have these things registered in your hearts.

Am going be listing them below and write a little about each. I won’t bored you with so much information; just going to give you the ones that will definitely benefit you…

1. PAPER SIZE
Before starting anything, it is very important to check your paper size.  If what you want to type is A3, you should know that you got to change your paper size to A3. If it’s for A4, you got to choose A4.

Wondering how to change the paper size? Go to Page Layout, click Size (at the left corner of the screen) then choose your desired paper size.

2. PAGE ORIENTATION
Page orientation is also important… We do have two types of page orientation which is the Portrait and Landscape. Why? Some documents are in portrait modes while some are also in landscape mode. It all depends what the user whats and what the document deserve. If your document will suit well on Landscape either due to the breath size or whatsoever, it’s left for you. If it’s best on portrait then choose it.

Do you know how to change the Orientation?

Go to Page layout then click Orientation. After which, choose your desired orientation type.

3. MARGINS

Margins are also very important because it gives your documents the appropriate fittings that suits it. We have some many margin types, it all depends on what you want. Like if you are the type that loves typing very close to the edge of the paper, I think Narrow page margin fits you write.

NB: Normal page margin is always on default, it’s left for you if you want to it that way.

That’s all I have for you all today, continue checking this blog for more useful stuffs like this.

Don’t forget to share with your friends.

Find and Replace: How to replace a word that appears multiple times in your document

Ms helps 2013 blog - find and replace
Hello friends,

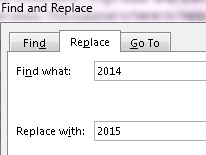
Have you been in that situation where you mistakenly type in a word/phrase continuously not knowing that it’s was an error? After typing, you then realised that you made that particular mistake over and over again and now it’s a stress to go back and start editing (replacing) them one after the other with the correct word. For example, you wanted to type “2015”, you were now typing “2014” in the entire document. Assuming this “2014” appears 30 times in the document, wouldn’t it be a big stress to go back and start editing each of them? Now, that’s why this article was made.

Find and Replace:  There is one feature I so love on Microsoft word and it’s this find and replace function – It’s very lovely. Using Find and replace makes it very easy for you to fix that error I talked about in the beginning paragraph (above) with just few clicks and you’re done. Let’s get started…

How to Use Find and Replace
  • Click Replace at the top right corner of the screen under Home tab.
  • A rectangular box would pop out, put the word you want to replace in that Find what box.
  • Then Put the word you want to replace it with in that Replace with box.
    Ms helps 2013 blog - find and replace
  • After that, click Replace all.
Automatically, every repetition of that particular word in your document would be replace.

It’s very easy to do. You wouldn’t struggle with that again because this tip will definitely help you. Any place you don’t understand do express it to me and I will try as much as possible to explain it better.

Thanks for visiting… Would be expecting your comments and also share this tip with your friends; you might not know who you may just help by sharing this article.

Tuesday, 19 May 2015

Shortcuts: A – Z Ctrl shortcuts and their functions.

Ms Office help 2013 - Shortcuts: A – Z Ctrl shortcuts and their functions.

Hello friends,

Am here with an article I believe you should you should know to make our journey in exploring Microsoft word 2013 easier and more interesting.

One function of a machine I love so much is that it makes work easier and faster. If a suppose machine doesn’t make work easier and faster, then it shouldn’t be called a machine. Same goes to your operations in a computer.

Appling the necessary shortcuts  during operations makes your work easier, more interesting and faster. Professional users uses shortcuts all the time, so I suggest you start using one.
Below is a list of some shortcuts keys applicable in Microsoft word 2013. It’s a-z of your shortcuts keys using “Ctrl”.
NOTE: Hold the Ctrl key and the corresponding key for a particular shortcut.

A – Z shortcut key using Ctrl
  • Ctrl + A     = Select all
  • Ctrl + B     = Bold
  • Ctrl + C     = Copy
  • Ctrl + D     = Font (brings up the font dialog box)
  • Ctrl + E     = Centre Margin (Moves your texts to the centre of the sheet
  • Ctrl + F     = Find (find a particular word, sentence or phrase)
  • Ctrl + G    = Go to (go to a particular page, paragraph, line etc)
  • Ctrl + H    = Find and replace (find a particular word / text / sentence then replace)
  • Ctrl + I      = Italics
  • Ctrl + J     = Justify
  • Ctrl + K     = Hyperlink
  • Ctrl + L     = Left margin
  • Ctrl + M    = Margin
  • Ctrl + N     = New document
  • Ctrl + O     = Open existing document
  • Ctrl + P     = Print
  • Ctrl + Q     = Remove paragraph formatting
  • Ctrl + R     = Right margin
  • Ctrl + S      = Save
  • Ctrl + T     = Paragraph
  • Ctrl + U     = Underline
  • Ctrl + V     = Paste
  • Ctrl + W    = Close a document
  • Ctrl + Y     = Re-do
  • Ctrl + Z     = Un -do

Like Us on Facebook