Hello friends,
I want to share this article with
you all because I believe that you really need it.
Have you been in that situation
when you insert a table and you feel like removing some border lines in it? You
must have tried everything you can think of but to no avail. The funniest thing
is that all you need to do in order to remove those lines is just to highlight
and click! Want to know what to click? Read
On…
How to Remove Table Borders
- Create a new document or open an existing word document.
- Create a table. If you don’t know how to create a table,click here.
- After creating a table, highlight the entire table
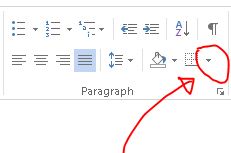
- Now click on this icon below. (it’s located under the home menu – in paragraph)
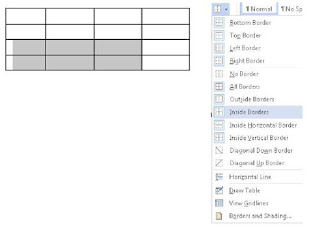
- From the drop down menu list, choose no border.
- Immediately, the entire borders of your table will disappear.
Note: This is for the entire table but if you want to remove some
particular cells of the table, highlight them (the cells) and choose the corresponding
options from the drop down menu.
For example, if you want to
remove the left and bottom border of the table, you just have to highlight the
cells you want to edit then choose left and bottom border from the drop down
menu.
Note: After removing the table border, that doesn’t mean that you
have deleted the table. It’s just that you made the borders invisible. You can
still bring back the invisible border by clicking the corresponding option.
Follow these steps carefully, if
you encounter any problem, do let me know through the comment bar. I will definitely
respond to your questions as quickly as possible.


No comments:
Post a Comment
...Please drop your comments & questions below